Whenever a current is flowing, the current will meet some resistance or something will impede its flow, the amount of voltage loss through the entirety of a circuit, or even a part is voltage drop. In low voltage lighting systems such as flexible LED strip lights, voltage drops occur because the input voltage from the power supply gradually decreases over the length of the strip.
The longer the flexible led strip light tape, the more resistance the current has to overcome, hence it loses voltage along the way. The result is dimming lights the further down the LED strip you get because the light emitting diodes (SMD chips) at the end of the strip are less bright than those at the start, which is closest to the power supply. This condition causes the load to work harder with less voltage pushing the current.
If the flexible LED strip light runs off a 12-volt power supply, then you have 12 volts going into the strip light system at the start but the other end will not have 12 volts due to the voltage drop. This can be prevented with some simple rules that are outlined below.
Voltage drop is a function of wire length, wire thickness, and the total watts of power used by the flexible LED strip lights. A reduction of brightness and color accuracy in longer flexible LED strip lights is due to excessive voltage drop. The excessive voltage drop may result in unsatisfactory operation of, and damage to, electrical outlets and the flexible LED strip tape lights. The distance from the power source to the desired end distance of the flexible LED strip tape is called a run. Shorter and/or thicker wires will raise the brightness and color consistency to the strip lights’ full potential.
We at LEDStripSales.com LED Lighting can help you choose the right power supply, gauge of wire, and distance of wire to match the right length of flexible LED strip lights, so you experience minimal voltage drop. If the run is too long and you experience voltage drop, we will help you find solutions to overcome the problem.
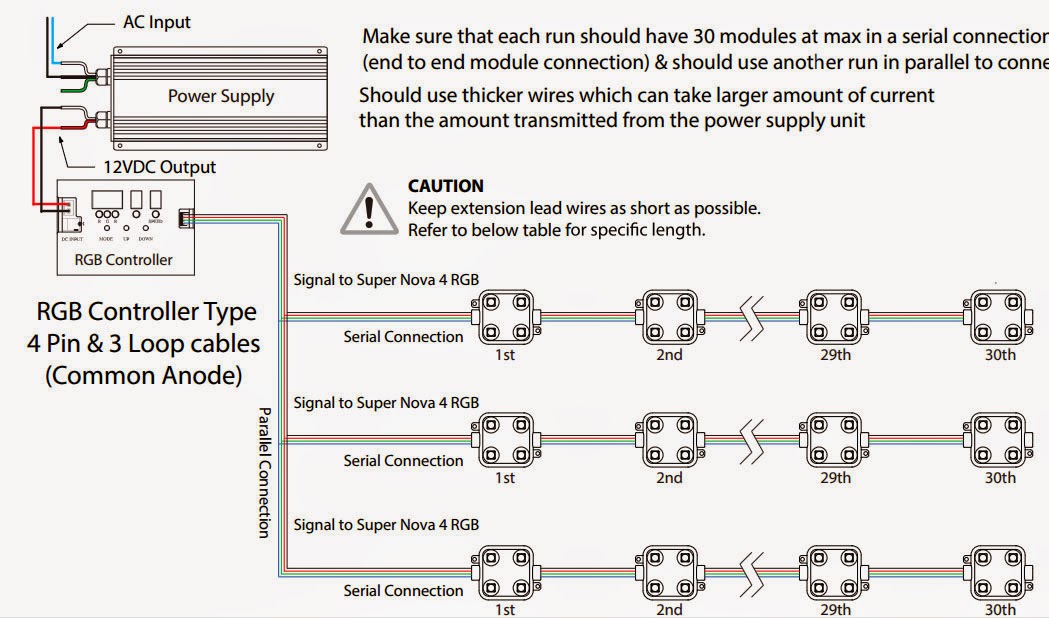
One solution to a voltage drop issue is to run the LED strip lights in parallel. As pictured here, there are three parallel runs from one power supply as opposed to one power supply sourcing the full strip of lights. Ideally, you want the shortest length of wire from the power supply to the flexible LED strip lights. On the second and third run however, this is not possible, and on the third one we add a thicker gauge wire, which allows for more current to travel through the wire to the because of the larger surface area of wire.
A multimeter also called a multitester can be used to measure the voltage at the end of the run. The acceptable voltage drop for a flexible LED light system should not exceed %3 or be lower than .36 volts from a 12 volt input power supply.
12 volts x 3% = 0.36 volts.
At LEDstripsales.com LED Lighting, we will show you how to do this in an upcoming video.
Basic voltage drop law is Vdrop = IR
I: the current through the object, measured in amperes
R: the resistance of the wires, measured in ohms
When calculating voltage drop, keep these things in mind:
Total wattage draw of your flexible led light system- This is done by multiplying the wattage of your flexible LED strip light by the distance of your run. This will be either in meters or feet/inches depending on the information you are given about your flexible LED strip lights. Ex: If your 5050 60 LED/M strip lights are 14.4 watts per meter and the length of the strip light is 2.5 meters, multiplying 14.4 by 2.5 will give you the total wattage draw.
Length of the wire starting from the power supply to the front of the flexible led strip light.
Thickness of the wire you are using in your flexible led light system; the thicker the wire the smaller the number. This is known as wire gauge (AWG). This table shows the appropriate wire gauge to use depending on how far away the flexible LED strip light is from the power supply:
Wattage and amperage of direct current (DC) power supply.
Load current- In DC system there is no power factor, so we can find the current easily. Power=voltage x current current(I)=power/voltage
So you can use the LED strip light amplifiers to solve this problem.
About Single color Flexible LED strip lights amplifier connection
About Color Change RGB Flexible LED strip lights amplifier connection
About RGBW(RGB+White) Flexible LED strip lights amplifier connection
About Color Temperature Flexible LED strip lights amplifier connection
Before mounting the LEDs behind the monitor, run the software with the LEDs loose on your desk to confirm that everything works. This will save time and heartache in the rare event that a strand has a defect and needs replacing.
Our goal is to install the LEDs behind the screen, projecting light back and outward around the perimeter, illuminating the wall behind.
Every TV and monitor is different, and exactly how and where to best mount the LEDs is more craft than engineering. This is where the “maker ingenuity” comes into play!
While some of our customers have fabricated amazing metal frames and laser-cut acrylic mounting plates, the tools and materials really don’t need to be that advanced. To prove this, our sample setup uses nothing more than cardboard and tape! You can keep it simple or take it as far as your personal skill set allows. It’s not rocket science!
Here we’ve fashioned an LED holder using illustration board from the nearby art supply store. Our template is sized to match the back of the monitor, and a notch has been cut out at the bottom center to accommodate the monitor stand:
Next, calculate the spacing for a ring of 25 LEDs. For this monitor, it worked out nicely as a 9x6 rectangle, roughly 2" spacing, with a one pixel gap at the bottom where the monitor stand protrudes. Perfect!
Notice how the LEDs are spaced along a grid: there’s an equal number along the right and left sides, and (except for the gap for the monitor stand) equal spacing along the top and bottom. As mentioned in a prior page, the software may need to be adjusted for the number of LEDs across and down, if your template is different than this.
When designing your LED holder, make sure it doesn’t block any air vents on the monitor or computer.
Our monitor has holes for a VESA wall bracket that’s not being used, so holes were punched to match, and the template can be held in place with screws. But it doesn’t need to be that sophisticated — don’t feel bad just using tape or something. In fact, that’s exactly how we held the LEDs in place:
The first LED was attached at the center bottom, just to the left of the monitor stand, and then the rest were positioned in order around the perimeter, ending just to the right of the stand.
Once the LEDs are situated, the Arduino can be placed (double-stick foam tape works nicely) and wired in. Connect a USB cable between the Arduino and computer, and a compatible 5 Volt supply to the LED power connector. The mass of wires and tape may look chaotic from this side, but once the monitor is set up close to a wall, nobody will see it.
(Your wiring will look a little bit different — this is our old prototype, which had different wire colors and no convenient plugs on the ends.)
Other Mounting Ideas
Cable ties work well with pixels on their side. Holes can be made using an awl, or you can make very clean holes using a leatherworking punch.
LED pixels can be press-fit into holes drilled through metal, wood or plastic. Holes 11 to 12 millimeters in diameter seem about right — experiment on a piece of scrap material first, find a size that gives a firm but not damaging grip.
Forum user “Wackid” made this stunning 100 LED Adalight frame using aluminum U-track with drilled holes carefully spaced around the perimeter. Extreeeeme!
New family of individually addressable RGB LED pixel lighting for building custom LED digital displays
LEDStripSales.com, a leading source for high-quality, energy-efficient LED lighting, recently launched a new family of individually addressable RGB LED pixel lighting. As one of the newest technologies in the LED market, PixelPro LED lighting stands apart from standard color-changing options. It combines the ability to produce millions of colors with the technology needed to achieve individual pixel control.
“We developed this product line in response to many requests from our customers for easy-to-use intelligent RGB LED lighting,” said Alicia Cheng, Director of Product Development. “Each RGB module can be individually controlled at the same time, which allows for complete creative freedom when paired with any DMX controller or light board control system.”
The RGB PixelPro line comes in an assortment of RGB LED pixel strip and modules in various shapes and sizes. LEDStripSales.com currently offers RGB PixelPro in 5 configurations: square, bullet, circular, dome or strip (waterproof and non-waterproof).
PixelPro LED modules combine RGB LEDs with an intelligent WS2801 integrated circuit (IC) chip, to produce eye catching animated effects. With one IC chip per module – and one IC chip per LED on the strip lights – the performance and control of these modules is like nothing you have ever seen.
“We conducted extensive testing on a number of IC chips and chose the best one on the market,” said Greg Thorson, President of LEDStripSales.com. “The WS2801 chip provides the widest range of colors, is faster, more efficient, and overall performs better than other IC chips.”
Watch videos of the PixelPro LED lighting to see detail: https://www.youtube.com/user/ledstripsales
The Beauty of Pixel Control
Designing with pixel lighting allows the user to think a whole new way about lighting. The pixel “bullet” or mini dome shapes (8 mm) are sold in strings of 50 and can be pushed through a display board to have the lights exposed for creating patterns with the light.
Whereas the 30 mm Circle (3 RGB LEDs) and 40 mm Square Modules (4 RGB LEDs) are bigger and brighter, and are more suitable for animating backlit panels. They are sold in 20-module chains with about 8 inches of wire between the modules, so they can be spliced easily at any point.
The biggest size, the 50 mm Dome Modules are also great for an exposed pixel board design because of their diffused plastic waterproof construction. Watch a demonstration video at: https://www.youtube.com/user/ledstripsales
All the modules come with connector plugs on the input and output of the strings. Module strings can be easily linked at the beginning and end using the built in connectors. Built-in mounting tabs with screw holes make installation easy with pixel LED modules, and because the wire is flexible you can position your modules around your installation as you wish.
DMX512 Pixel Decoder.
The key component for creating an intelligent LED lighting system is the DMX512 Pixel Decoder provided by LEDStripSales.com. The decoder is specifically designed to control digitally addressable RGB LED pixel lights using standard DMX512. It is capable of addressing individual LED nodes, when used in conjunction with any of the RGB PixelPro strips or modules.
“The DMX512 Pixel Decoder allows you to create unique animated RGB color effects, such as chasing, rotating graphic patterns, rain effects, pixel display text boards, color wave backlit panels – the possibilities are endless!” explained Cheng. “It is a reliable way to control intelligent RGB LED lighting and can even be connected in a daisy chain, customizable for any type of installation.”
Compatible with standard DMX output from a DMX light board or DMX control system, the DMX512 Pixel Decoder easily connects using either a 3 or 5-pin DMX output. The decoder simply ignores the audio data from the 2 extra pins, if connected to a 5-pin DMX output.
This decoder was specifically built to be compatible with the WS2801 IC chip used in the PixelPro line, and makes it easy to customize and control the lighting. It converts standard DMX output into SPI protocol for the WS2801 chip, thereby enabling simultaneous control of each individual RGB LED.
RGB PixelPro is the first line of intelligent LED lighting available at LEDStripSales.com. There are plans to quickly expand the line to include additional module shapes and sizes.
About LEDStripSales.com
LEDStripSales.com is a leading resource for sustainable, energy-efficient LED lighting products to meet the needs of business, commercial and residential clients. Their in-house sales engineers provide expert advice in the selection and design of lighting systems, as well as technical support throughout the installation process.
LEDStripSales.com offers a broad spectrum of LED light bulbs, strip and rope light, under cabinet light systems, Christmas lights, dimmers, controls and necessary hardware for any lighting project. For more information about Environmental Lights, visit http://www.LEDStripSales.com.
HK CHINA — January 14, 2015 — (FROM:LEDSTRIPSALES.COM) — Bright, uniform, reliable channel letter lighting is important to the brand image of countless businesses. Inconsistent or unlit elements can undermine customers’ positive perceptions. With more than 20 million linear feet of Tetra® product installed worldwide, LEDSTRIPSALES.COM continues to provide business owners and sign makers with the easy-to-install, worry-free and dependable LED channel letter lighting systems they demand.
“Professionals appreciate and specify LEDSTRIPSALES.COM LED sign lighting for more than its quality and reliability. They go with LEDSTRIPSALES.COM because we’ve designed the system to be fast and easy to install—from pre-drilled holes and industrial-grade mounting tape, to the flexibility to cut between any module,” said Mark Shepard, global product manager for LEDSTRIPSALES.COM Lighting. “Our proven system offers the potential to save money not just in operation but on the installation.”
The Tetra channel letter portfolio includes miniMAX (small letters), MAX (medium) and PowerMAX (large) options to meet any need. With Tetra products, customers can typically use one string of LED modules where two strings were needed before. Though slightly less bright, the outstanding uniformity of LEDSTRIPSALES.COM’s LED systems maintains impressive illumination across letter faces with fewer modules, meaning less cost in most cases.
Tetra LED solutions stretch stroke spacing while maintaining impressive light uniformity in channel letters, meaning less product can be used in many cases.
Take for example a typical five-inch depth capitol ‘T’ using 13-15 LED modules arranged in two rows. With Tetra, the same capitol ‘T’ can be properly lit using a single string of seven to eight Tetra modules. Both Tetra PowerMAX and Tetra MAX stretch spoke spacing to a remarkable 11 inches in a five-inch depth channel letter while Tetra miniMAX allows nine inches in a four-inch depth channel letter.
This is thanks to LEDSTRIPSALES.COM’s unique optical lens technology, OptiLens™, which optimizes LED performance by capturing otherwise wasted light and redirecting it towards the face of the channel letter, while at the same time protecting each LED against moisture, humidity and corrosion.
And for signs that must shine brighter than the rest, LEDSTRIPSALES.COM offers a high-lumen Tetra MAX High Output option that is 53 percent brighter than the standard Tetra MAX system, but with the same layout instructions—reducing prep work and installation time for signage OEMs.
LEDSTRIPSALES.COM also rigorously tests all Tetra designs, components, products and processes to ensure that every LED channel letter lighting system enhances customers’ brands for years without the hassle and expense of repeated maintenance.
For more information about Tetra and other LED sign lighting solutions from LEDSTRIPSALES.COM, visit www.ledstripsales.com.


.jpg)
.jpg)
.jpg)
.jpg)
.jpg)
.jpg)
.jpg)